EASA - The Electro•Mechanical Authority
Facebook Twitter LinkedIn YouTube Menu Search Arrow Right Arrow Left Arrow Down Arrow Up Home Arrow Next Arrow Previous RSS Icon Calendar Icon Warning Icon
ROOM RESERVATIONS NOW OPEN FOR 2026 CONVENTION  RESERVE YOUR ROOM

Meet Eddy - Webinar Highlights AI Tool's Potential

Hello, EASA community! My name is Eddy, and I am your AI-powered assistant here to support you in navigating EASA’s vast resources. I’ll be hanging out in the lower right corner of EASA's website whenever you'd like to have a conversation with me, or you can navigate directly to me at easa.com/eddy.

I've been trained on a vast array of EASA materials which will allow me to help find and summarize information quickly, aid in writing procedures, write drafts of articles, point you to resources and much more. Don’t be afraid to experiment with other ideas.

START USING EDDY CREATE BETTER PROMPTS JOIN EASA

Technical Manual Updates Available; Members Download for Free

EASA Technical ManualAn update to EASA's most comprehensive technical resource is now available for FREE to association members. Reviewed by EASA's Technical Services Committee and revised by staff, important updates have been made to: 

  • Section 3: DC Machines
  • Section 4: Transformers
  • Section 5: Electronics
  • Section 6: Magnet Wire & Lead Wire
  • Section 7: Electrical Testing
  • Section 12: Tech Notes

DOWNLOAD FOR FREEBUY A PRINTED COPY

NOT A MEMBER? JOIN US!

Nominate Someone For The EASA Award

EASA AwardDo you know any exceptional industry individuals? If so, nominate them for the Exceptional Achievement Service Award.

The Exceptional Achievement Service Award recognizes individuals who have provided exceptional service to the electrical apparatus sales and service industry. The award is presented at the Association convention.

Deadline: January 1, 2026

LEARN MORE & SEE PAST RECIPIENTS

SUBMIT A NOMINATION

Take Advantage of Online Learning

EASA Learning CenterThe new EASA Learning Center is now online and ready to provide industry-specific training. You are now able to provide your employees with access to much of EASA's training without leaving your service center! Access to EASA’s Online Learning Center is sold as 12-month subscriptions and targets employees of all skill levels.

ERT Certificate Program
Also delivered through the EASA Learning Center is the new Electromechanical Repair Technician (ERT) Certificate Program. The ERT Cetificate Program provides new, existing, and potential employees in the electromechanical repair industry a structured learning path to become a well-rounded, service center technician. 

EASA LEARNING CENTERERT PROGRAM

New DC Standard Introduced

There is now a much-needed DC repair standard, created through the participation of EASA members and industry motor users. The scope, as written in the document, states: “This document covers general recommendations for the repair of DC electric motors and includes guidelines for both the user and the repair facility ... . This standard covers reconditioning, repair and rewind of horizontal and vertical wound-field direct current motors and generators. It applies to all ratings above 0.75 kW (1 hp).”

READ MORE

Video Explains Single-Phase Rotor Test

Single-Phase Rotor TestThis new video provides a quick guide on performing a single-phase rotor test on a three-phase squirrel cage motor to check for open rotor bars. It provides an introduction to its purpose, the preliminary tests and a step-by-step procedure.

WATCH THE VIDEO

Dupuis Honored at EASA 2025 Event

Mike DupuisMike Dupuis of MDR Axis of Belle River, ON, Canada was presented with EASA's 2025 Exceptional Achievement Service Award. Read more about his contributions to our industry.

READ MORE

NOMINATE AN INDIVIDUAL

Barry Bullard, EASA Chairman of the Board

Tech Tip: Resolving Phantom Oil Leaks in Vertical Machines

Jonathan Robinson
Technical Education Committee Member
Burford Electric Service, Inc.

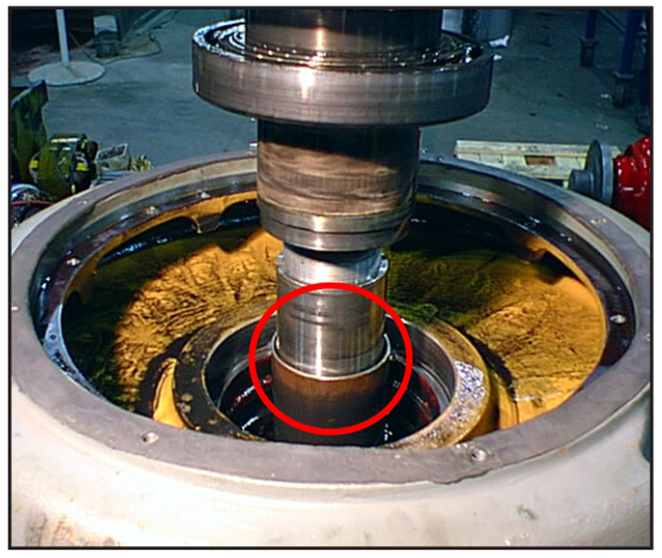
Oil-lubricated vertical motors rely on a properly sized, sealed and aligned oil standpipe (Figure 1) to maintain lubrication levels without leakage. A tilted or improperly sized oil standpipe can allow oil to migrate upward along the pipe’s wall when the motor is in operation, leading to leakage, loss of lubrication and potential bearing damage. This issue can be overlooked during assembly or inspection, but a few simple checks can prevent costly problems. 

  • Leak Check – Elevate the motor’s endbell on risers, and place brown butcher paper below the standpipe area. Fill the endbell with mineral spirits and let it sit overnight if time permits. Check the paper for oil drips. If necessary, reseal the standpipe. 
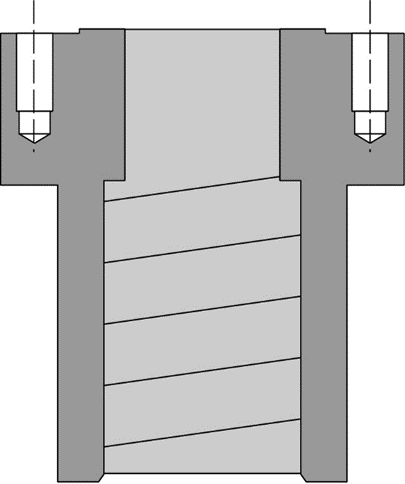
  • Visual Inspection – Check for threading on the inside diameter (ID) of the motor’s bearing carrier (Figure 2) or the outside diameter (OD) of the standpipe that can cause oil to climb the standpipe when the machine is in operation. 
  • Confirm standpipe seating – The standpipe should be fully and evenly seated in the motor’s endbell. Uneven seating can create a tilt and lead to leaks under operating conditions. 
  • Checking for standpipe tilt – If a coordinate measuring machine (CMM) is not available, an ID micrometer can be used to check for standpipe tilt. Using the ID micrometer, technicians can measure the distance between the OD of the standpipe and the inside of the motor’s endbell at four locations 90 degrees apart to verify that the oil standpipe is not tilted. A smaller measurement in any of these four coordinates indicates that the standpipe is tilted in that direction. Ideally, the measurements would be within 0.005” (0.13mm) of one another. 
  • Check the inside of the bearing carrier skirt for taper - If the upper part of the clearance is larger than the bottom, it will pump oil upwards. One tip is to machine the inside of the skirt so that it is 0.020” (0.51mm) larger at the bottom than the top. 
  • Standpipe clearance to shaft umbrella fit – Capillary effect can draw oil over the motor’s standpipe if the clearance between the OD of the standpipe and the ID of the shaft umbrella fit is too close. This problem is most likely to show up when the motor has had the standpipe replaced. The minimum clearance that we typically like to see between these parts is 0.030” (0.76mm) to the side. 

Taking a few minutes to verify oil standpipe alignment during assembly or inspection can save hours of downtime, prevent messy oil leaks and extend bearing life. This small step is a big part of reliable vertical motor operation.

Stand pipe

Figure 1: Standpipe shown, circled.

Figure 2:  Even a light machined thread inside the bearing carrier acts as an Archimedes screw, the crudest form of a pump. It can lift oil from the sump to where the bearing carrier fits on the shaft, causing leakage.


Upcoming Events

No content

A problem occurred while loading content.

VIEW ALL EASA TRAINING EVENTS
VIEW ALL CHAPTER EVENTS
Upcoming Webinars

No content

A problem occurred while loading content.

New Resources
EASA RESOURCE LIBRARY